This post is replica of post here. I created it so that I can have a backup in case the article is no longer available.
Sometimes your computer could run very slow even though you have only very few programs running. When you check the Task Manager trying to find out which application or program is at fault, you see the status bar of your disk usage could be up to 100%.
This is a rather annoying problem and your computer is running very slowly or even freeze while even though you are running out of programs to kill.
Luckily, this is not a hard problem to solve. Follow the options provided here and see if the problem goes away.
Option One: Disable Windows Search
Option Two: Disable Superfetch Service
Option Three: Reset Virtual Memory
Option Four: Disable Antivirus Software and Windows Defender
Option Five: Change the settings in Google & Skype
Other Options
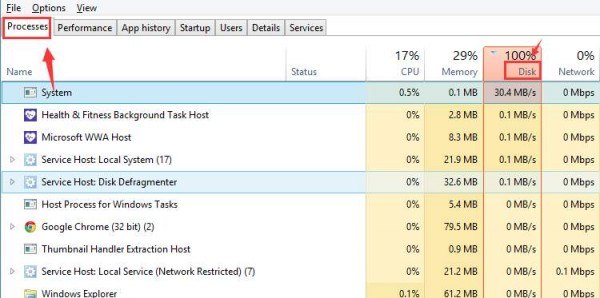
Note: It is suggested that you open the Task Manager window to see if the option can actually help you decrease the disk usage from 100% to less. To enter Task Manager, right click the task bar and choose Task Manager.

Note that it may take some time since the drive is rather slow.
Look for the Disk column in Process tab. The colored red tab and the number 100% indicate that you are having a problem with your drive.
Option One: Disable Windows Search
1) Type cmd.exe in the search box. From the list of choice, right click Command Prompt and choose Run as administrator.
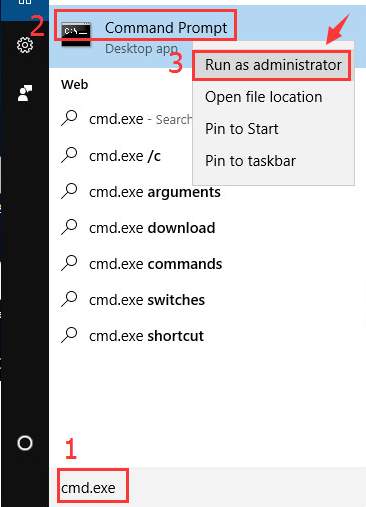
Click Yes at the UAC window prompt.

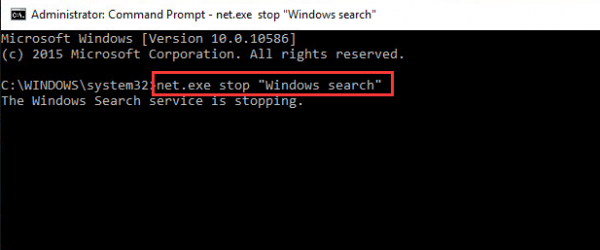
net.exe stop “Windows search”
Then hit Enter.
If you would like to stop Windows search permanently, please do the following:
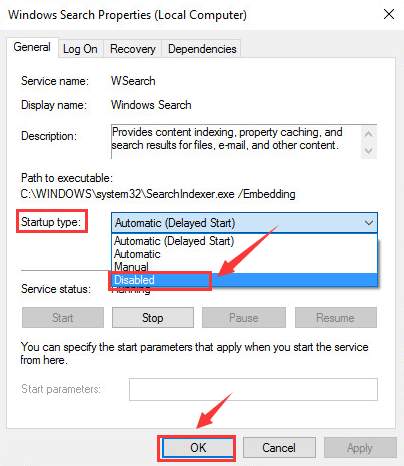
a) Press Windows key + R at the same time, and type in services.msc.

b) Locate Windows Search option, double click it to enter its Properties window.
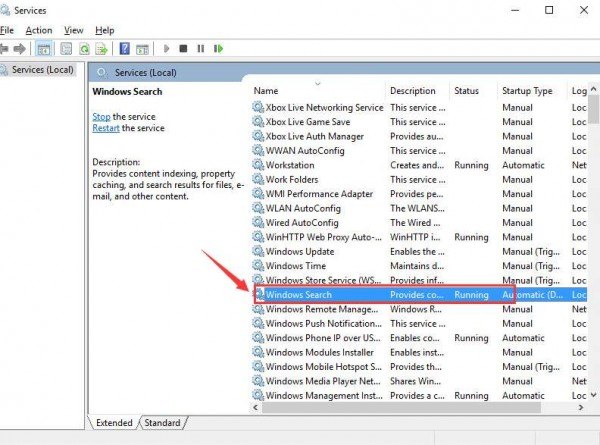
c) Change the Startup type to Disabled. Then click OK to save the change.
Check to see if the disk usage and the performance of your computer improve or not, if not, please move on.
Option Two: Disable Superfetch Service
Superfetch service has been identified as a potential cause of disk performance issues in Windows 8 and later operating system. To stop this service, you can follow the instructions below.
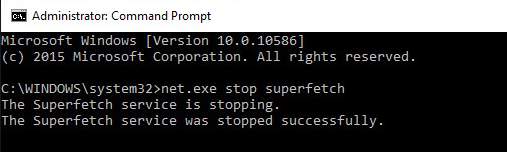
1) Type cmd.exe in the search box. From the list of choice, right click Command Prompt and choose Run as administrator.
Click Yes at the UAC window prompt.
2) Type in the following command:
net.exe stop superfetch
and then hit Enter.
Wait for a few minutes to see if changes can be seen on your computer’s performance.
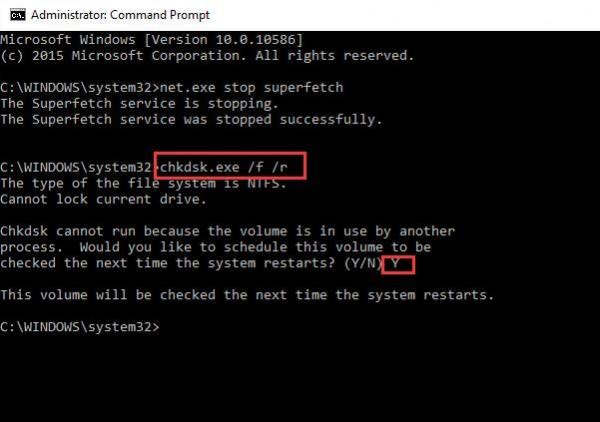
If you want, you can also run a disk check by typing the following command:
chkdsk.exe /f /r
and hit Enter. Then type Y to confirm the disk check by the time you restart your computer. Please make sure you have closed all of your applications first.
If disabling these two services still don’t help, please try the methods that follow.
Option Three: Reset Virtual Memory
Virtual memory can be considered as the extension of computer’s physical memory. It is a combination of RAM and a portion of your hard drive. When the RAM is not enough, Windows will make use of the virtual memory for temporary file storage and swap them back when required.
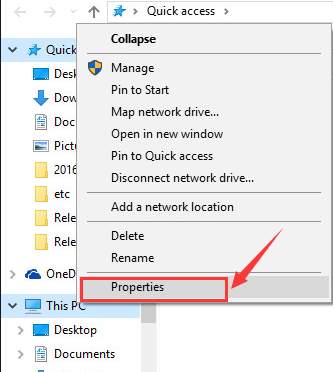
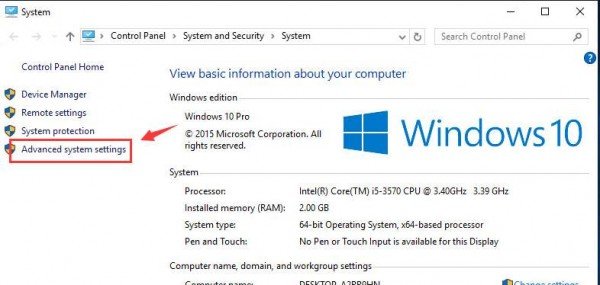
1) Follow the path Start > File Explorer. Right click This PC and choose Properties.
2) Click Advanced System Settings on the left panel.
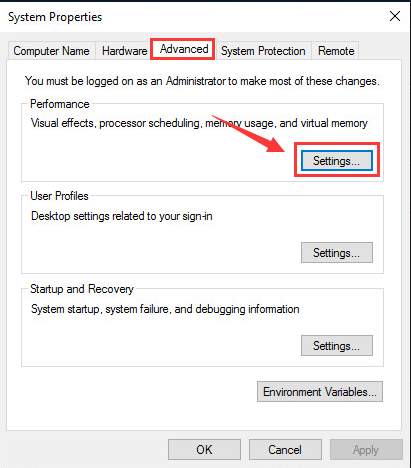
3) Click the settings button under Advanced tab.
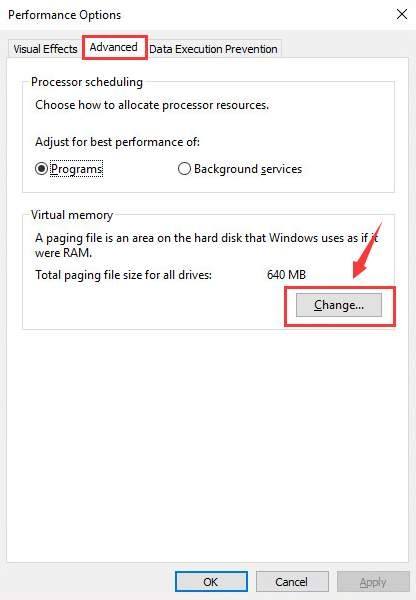
4) Go to Advanced tab, and choose Change in Virtual memory category.
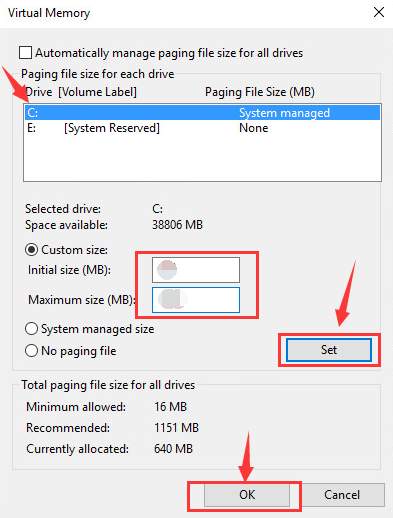
5) Make sure the box before Automatically manage paging file size for all drives is off.
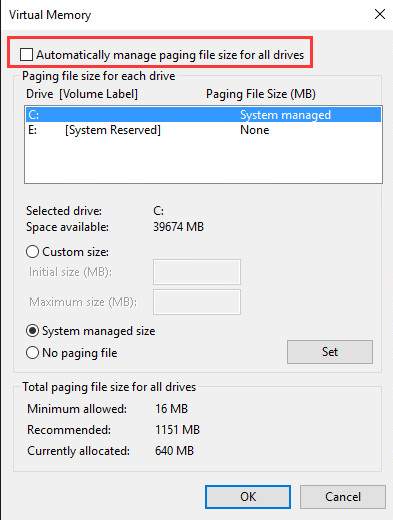
6) Select your windows drive, that is where you store your Windows operating system(usually partition C), set the number accordingly. Then press Set and then OK to continue.
Note: As a general rule, we don’t want the size of the paging file become too big, thus with the limited maximum size. The general maximum size of the paging file must be x1.5 the amount of RAM installed. For a PC running with 4 GB of RAM, the maximum size of the swap file will be 1024 x 4 x 1.5 Mb.
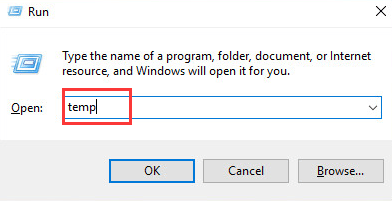
7) Please also remember to clear all files by doing the following procedure. Press Windows key and R at the same time, type in temp and hit Enter.
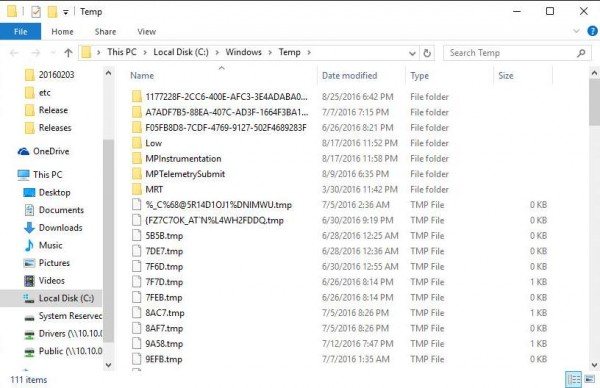
8) Select all the files and delete them.
Option Four: Disable Antivirus Software and Windows Defender
1) If you have installed antivirus or anti-malware programs such as Norton, Kaspersky, AVG, or Malwarebytes, it is suggested that you turn them off or disable them temporary to see if the disk usage could be back to normal. If the antivirus or anti-malware software is at fault, it is suggested that you consult the manufacturers of the software to see if they can provide some help.
Related post:
How to temporarily turn off Norton Antivirus program?
How to stop AVG temporarily?How to disable Avast temporarily?
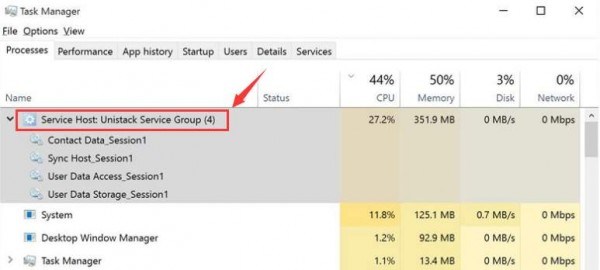
2) Microsoft has its own default anti-malware, Windows Defender. This program is automatically enabled even when you have an alternative antivirus application. In Windows 10, the Cloud-based protection is on automatically also, which is reported to occupy a majority of bandwidth usage and I/O. You might see the Service Host: Unistack Service Group category in Task Manager.
Luckily, you can disable Windows Defender service fast and easily.
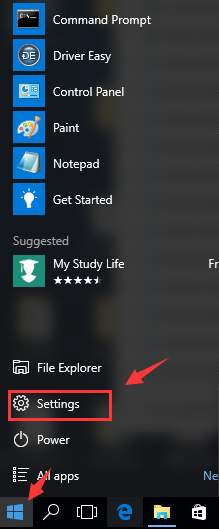
3) Click Start button and choose Settings.
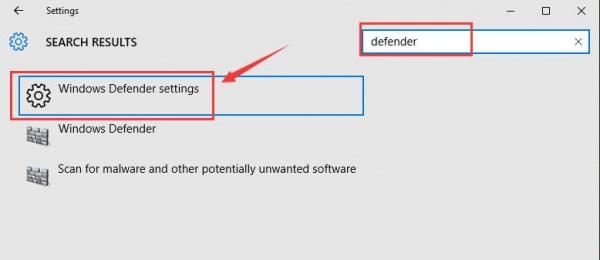
4) In the search box, type in defender and choose Windows Defender settings from the list of choice.
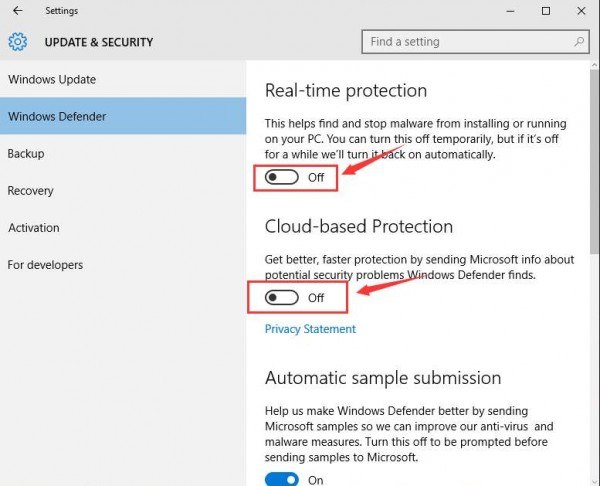
5) Turn off the Real-time protection and Cloud-based Protection.
You might see the notification popping out from the bottom right corner, you can ignore it.

For some, this is a problem caused by the combination of Skype and Google Chrome browser. Similar issue with other programs could also cause 100% disk usage. Here is the solution provided for you to fix the problem with Google Chrome and Skype only.
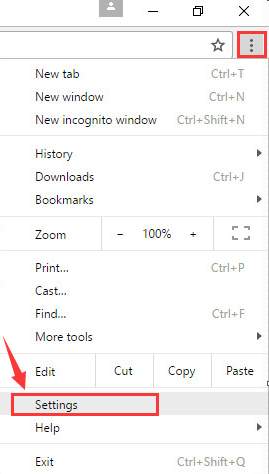
1) In Google Chrome, click the three-dot icon on the upper right corner and choose Settings from the list of choice.
2) Scroll down to the bottom of the page and choose Show Advanced Settings….

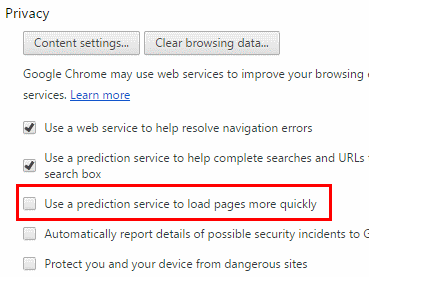
Then go to Privacy category and un-tick the option Prefetch resources to load pages more quickly.
3) Make sure that your Skype is officially off and it is not running in the task bar.
Follow the path C:\Program Files (x86)\Skype\Phone\.
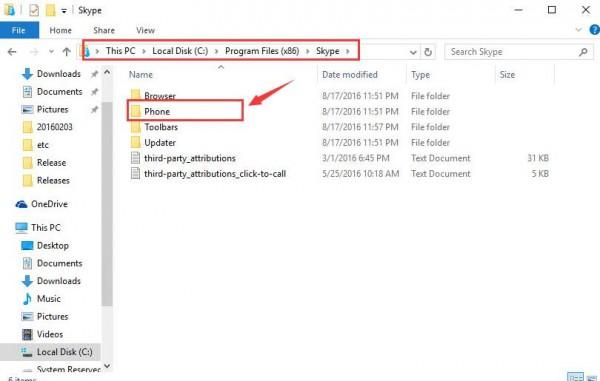
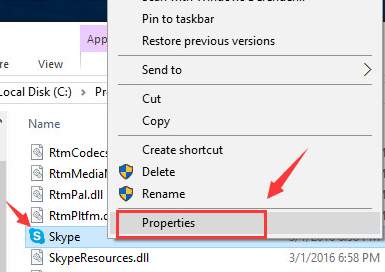
4) Right click the option Skype.exe and choose Properties.
5) Then go to Security tab. Choose Edit.
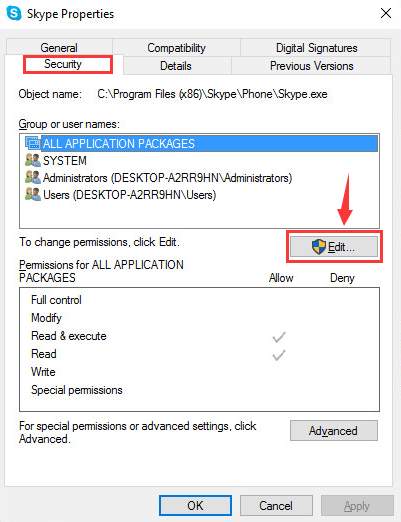
6) Highlight ALL APPLICATION PACKAGES and tick the box in the Allow Write option. Click Apply and then OK to save the change.
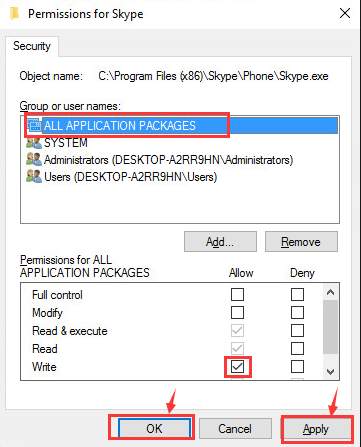
Now check your disk usage in Task Manager to see the change.
Other Options
1) It is always recommended that you keep your system device drivers updated so as to avoid any unwanted problem with your PC while keep it at its peak performance.
To update your device drivers quickly and easily, you can have a try at Driver Easy, the updater that automatically detects, downloads and updates missing and outdated device drivers for your computer.
If you want to update all your device drivers in just ONE click whilst enjoy tons of other features, by all means, have a try at the professional version of Driver Easy. It will not let you down. If you are not satisfied with it, just send a request within thirty days, and you are getting your money back.
2) Note: A million thanks to our warm-hearted reader Javier for the following solution.
This issue could also be caused by some Advanced Host Controller Interface PCI-Express (AHCI PCIe) models running with the inbox StorAHCI.sys driver due to a firmware bug.
a) First, identify if you are running the inbox AHCI driver (StorAHCI.sys):
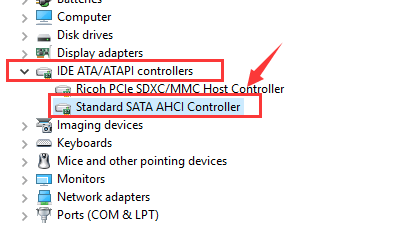
Open Device Manager, then go to IDE ATA/ATAPI Controllers category. Under this category, double click the AHCI controller.
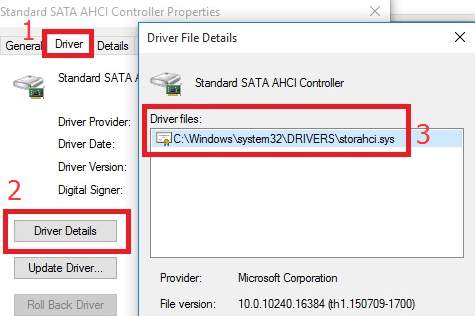
Then navigate to Driver tab, and click Driver Details. If you can see storahci.sys stored in a path of system32 folder, then you are running the inbox AHCI driver.
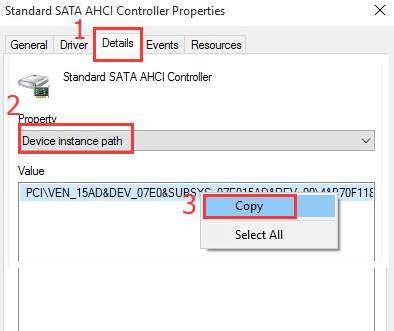
b) Close the Driver Details window. Now go to Details tab. From the drop down menu, choose Device Instance Path. Right click the path and choose Copy.
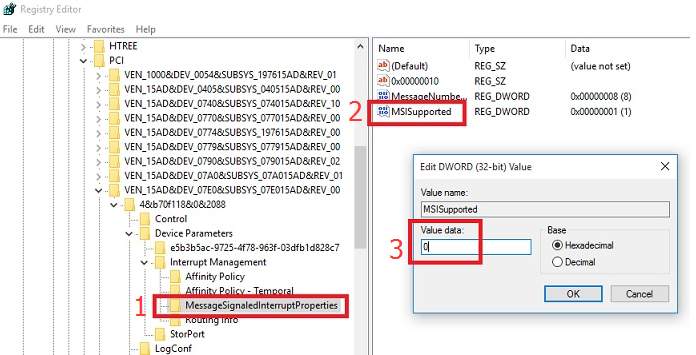
c) Type regedit in the search box of Start panel, then hit Enter to run Registry Editor. Then follow the path:
HKEY_LOCAL_MACHINE\System\CurrentControlSet\Enum\PCI\ <AHCI Controller>\<Random Number>\Device Parameters\Interrupt Management\MessageSignaledInterruptProperties
Double click the MSISupported key and change the value to 0.
d) Restart your computer after the change.
3) If your high disk usage is caused by WPR_initiated_DiagTrackAotLogger_WPR System Collector.et, please refer to the post below for more information:
Fix High Disk Usage caused by WPR_initiated_DiagTrackAotLogger_WPR System Collector.et
4) If the high disk usage problem is caused by IAStoreDataSvc (32 bit), please refer to the post below:
Solve Windows 10 High Disk Usage caused by IAStoreDataSvc (32 bit)
No comments:
Post a Comment